
We are excited to bring you the updated version of the MC Hammer pants. Yeah! A child's version of the famous pants. We call them the pyramid pants (Mostly because youngsters don't know who MC Hammer is. Not OK.) And after making them, we think every child should have them. They are that awesome. Stylish, comfortable and funny. If you know me, you know I like funny. Almost forgot, they are very, very easy to make. I like that too. Just in case you decide to make a pair for yourself (as you should), use the same steps to make an adult pattern.

We start with the pattern making. You will need paper (old news paper, wrapping paper, freezer paper or pattern paper), pencil, scissors, and child's measurements (waist, length from waist to heels).

 Instructions (Use the pictures above as reference):
1. Decide the length of the pants by measuring the child from waist to heels + 2 inches. Make a square where a side equals the measurement you took. (Note: It's really best to make a muslin to determine the final length. I only made the pants in one size, and it might not work across all sizes)
2. Fold the square in half to make a triangle, as shown.
3. Fold again, as shown.
4. To create a waist line, you'll need the child's measurements plus an inch or so, divided by four. [Mine was (23+1)/4=6]. Mark the calculated measurement along the side of the triangle, then use a plate to make a nice curvy line.
5.Unfold the triangle, trim the middle a bit to make it smooth and curvy. You are almost done. Time to cut the leg openings.
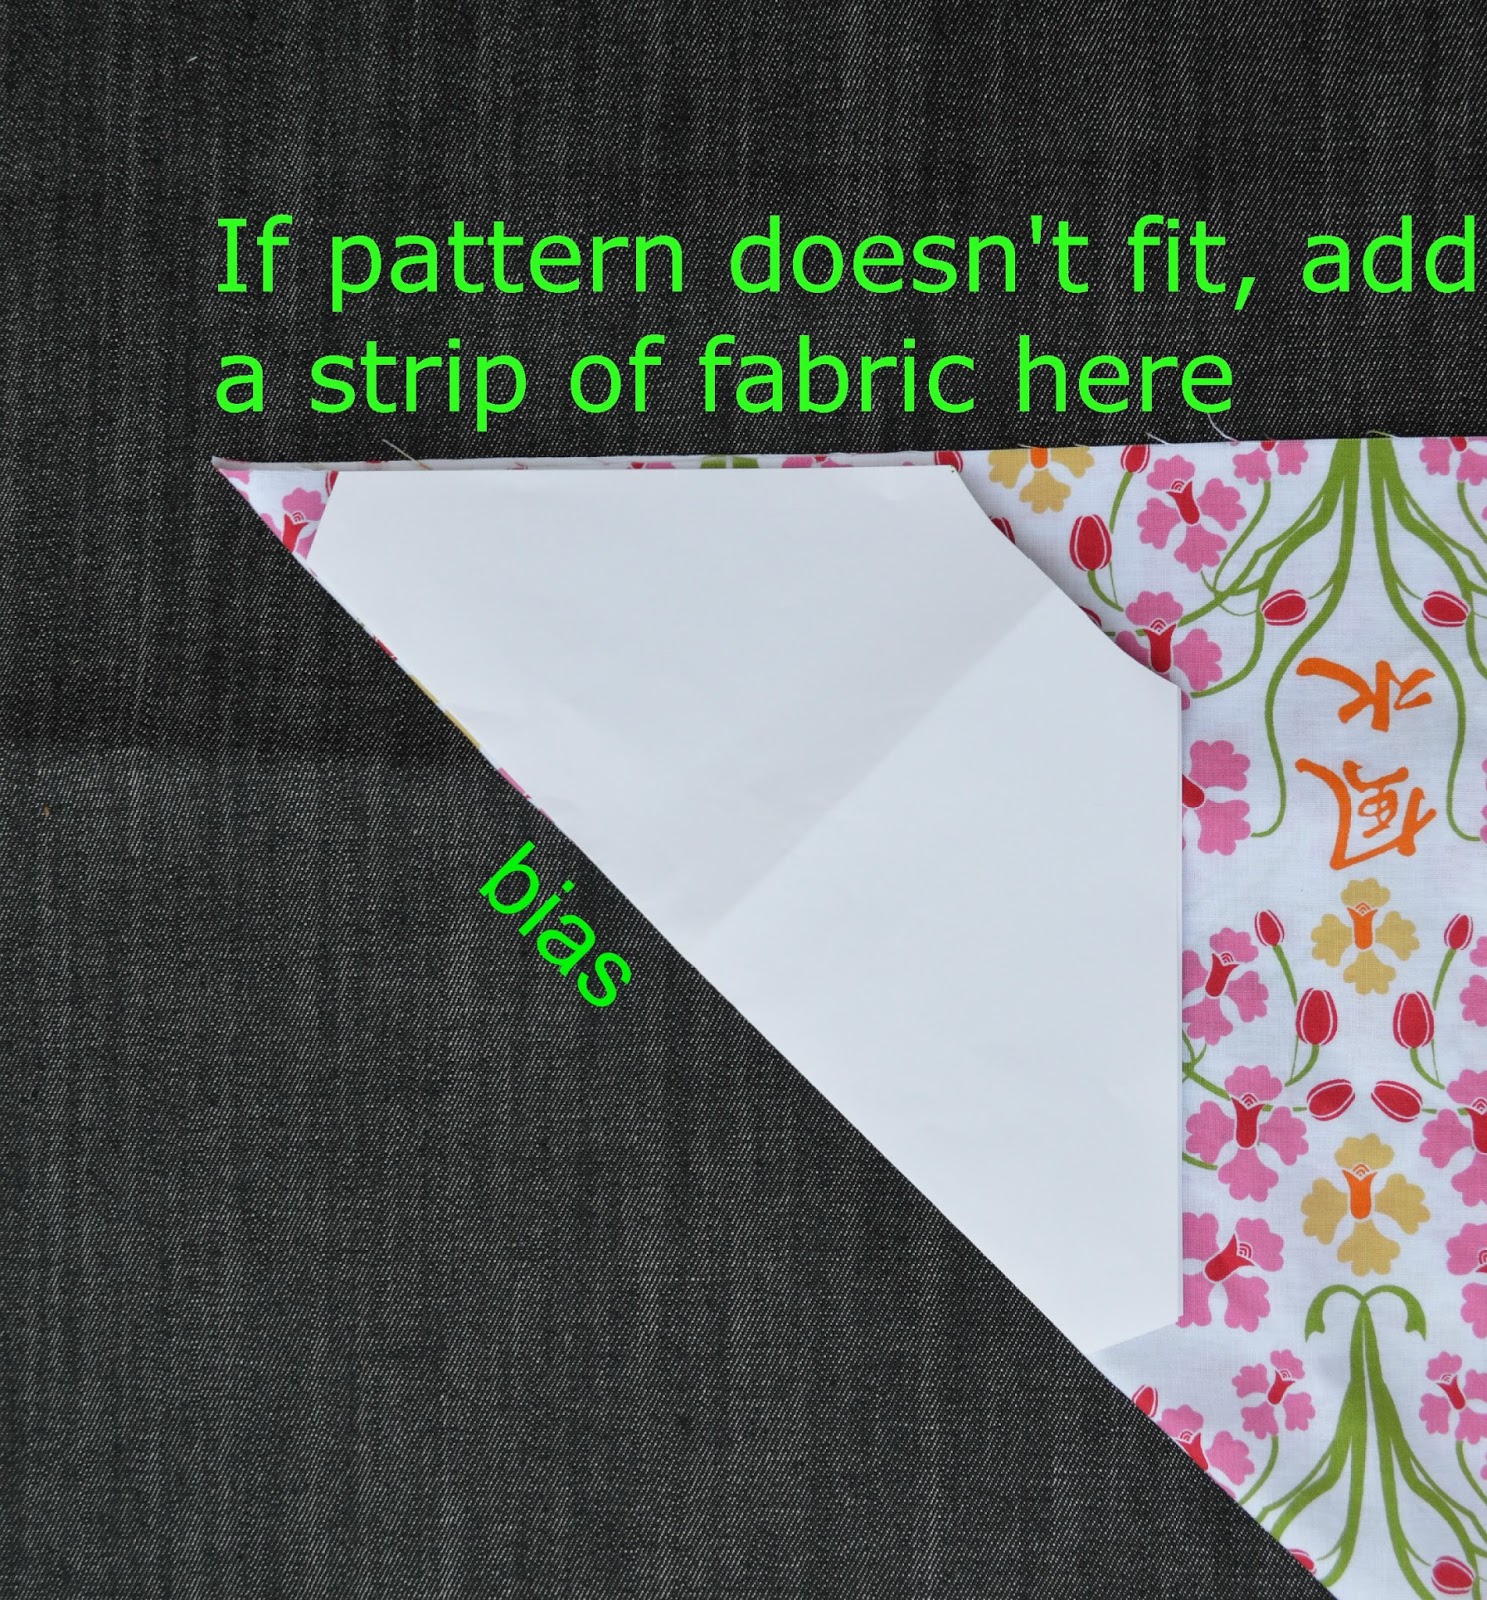
6. Subtract 2-3 inches from the length and mark it on the pattern. Cut the tips of the triangle off, as shown in picture. (Update: if you are sewing smaller sizes, the leg opening might not be wide enough. You can remedy the problem by either cutting off more than two inches or adding a few inches to the leg length to create a larger triangle, then subtract two inches and cut off the tips.)
7. Carefully measure the waist and leg openings. Cut a three-inch wide waistband according to your measurements. Cut two three-inch wide cuffs, also according to your measurements. Make sure they fit the waistline and leg opening.
8. Fold the fabric at 45 degree angle, as shown in picture below.

For sewing instructions go HERE.

We start with the pattern making. You will need paper (old news paper, wrapping paper, freezer paper or pattern paper), pencil, scissors, and child's measurements (waist, length from waist to heels).


1. Decide the length of the pants by measuring the child from waist to heels + 2 inches. Make a square where a side equals the measurement you took. (Note: It's really best to make a muslin to determine the final length. I only made the pants in one size, and it might not work across all sizes)
2. Fold the square in half to make a triangle, as shown.
3. Fold again, as shown.
4. To create a waist line, you'll need the child's measurements plus an inch or so, divided by four. [Mine was (23+1)/4=6]. Mark the calculated measurement along the side of the triangle, then use a plate to make a nice curvy line.
5.Unfold the triangle, trim the middle a bit to make it smooth and curvy. You are almost done. Time to cut the leg openings.
6. Subtract 2-3 inches from the length and mark it on the pattern. Cut the tips of the triangle off, as shown in picture. (Update: if you are sewing smaller sizes, the leg opening might not be wide enough. You can remedy the problem by either cutting off more than two inches or adding a few inches to the leg length to create a larger triangle, then subtract two inches and cut off the tips.)
7. Carefully measure the waist and leg openings. Cut a three-inch wide waistband according to your measurements. Cut two three-inch wide cuffs, also according to your measurements. Make sure they fit the waistline and leg opening.
8. Fold the fabric at 45 degree angle, as shown in picture below.
For sewing instructions go HERE.


These are super cute! Ania definitely looks way better in them than I did in the hmmm late eighties (?)
ReplyDeleteWhat the what??? No way that triangle makes those cool pants. I'm staying tuned for the construction.
ReplyDeleteI love that you are including the math equation. The other day I was reading an old pattern book and it talked about how for when sewing for older children you should look to style icons such as MC hammer.
ReplyDeleteOk, so I just subscribed to get your posts via email so I don't miss part 2!!! J/k it's more like I love you blog and don't want to miss a post! and what a great idea with the triangle, now I am really curious for the sewing steps!
ReplyDeleteSo cute! The triangle is perfect.
ReplyDeleteI just receive the email for this post!. What an amazing and cool pair of pants. Love them.
ReplyDeleteO, those are some cool pants. Although I was associating them more with some current-day hippies, not so much rappers, but apparently I m behind on the trends :) BTW, I ve wanted such pants for a while already, to wear at home. maybe u can also make a pair for me from some light, natural fabric? pretty pleeease?
ReplyDeleteI'm so excited about these... Found some lovely pillow cases at the dollar store today and will be making the cheapest yet COOLEST pants ever... can't wait to see the result on my baby girl!!!
ReplyDeleteI've tried these pants twice now and I can't make them work. :(
ReplyDeleteIs this intended for knit fabric, because the pictures look like you're using cotton.
SO sorry to hear! I can't reply to your comment through an email, since you are a non-reply blogger. THis is woven. What is not working, exactly, maybe I can help?
DeleteHi there, thanks for this post. I have made the pants but I would like to respectfully suggest that the pattern needs some further explaining and the instructions need to be adjusted, as I had real trouble the first time and it took me a lot of mucking around to get it to work. I think the first step of the pattern making process should alert people that they need to add extra length on to the side of the square, due to the amount that is cut off for the waist band and the foot holes. For me (as I was making them for a 10 yr old) this was 8 inches for the waist, and nearly 5 inches for the feet. So the first time I made this pattern my "finished length" was going to be 13 inches too short. Which is rather significant! I'm not sure of the formula for working out how much extra to add (I did it by trial and error) but i think it is misleading to say "make a square where the side equals the length of the pants". You are going to be cutting quite a lot off, so the length of the square needs to have extra added in the first place! Otherwise, the pants came out great (after my confusion and figuring this out). I hope you can receive this feedback in the constructive spirit it was intended. Best wishes and thank you.
ReplyDeleteHello, thanks for the cool pattern. I have made these twice now and although I did manage to make them work in the end I hope you don't mind if I respectfully suggest that the instructions and pattern need some adjustment.
ReplyDeleteThe first step in making the pattern needs to acknowledge that actually the side of the square needs to be longer than the intended length of the pants, due to the fact that you are going to cut some off this length to make the waist band and the leg openings. In my case (as I was making them for a 10 year old) I ended up cutting 8 inches off for the waist and almost 5 for the leg openings. So, on my first attempt, the pattern ended up being 13 inches too short in length which is quite significant. I realise that you do add a little to the length once you add in the waistband and leg cuffs, but it wasn't enough to make up 13 inches.
I'm not sure of the formula to work out how much extra to add to the length of the square (I did it by trial and error), but I definitely feel it is misleading to say in the first step "Make a square where a side equals the length of the pants." I did manage to work it out, but it was time consuming and a bit frustrating, especially when the reason why I chose this pattern is that it looked simple and straight forward when I read through it and I only had a short amount of time to work on it.
Other than that, the pattern works well and the pants turned out great so thanks for putting it out there. I hope you can receive this feedback in the constructive spirit that I intended it in.
Best wishes.
Thank you for taking the time and leaving a comment. I will rephrase that step. It worked for me to measure from the waist to the floor, but it might not be enough for somebody who is taller. I only made them for my then 5 year old. Again I appreciate your time! I am glad the pants turned out. If you are interested, please join the Coffee and Thread Patterns facebook group. I just started the group and would love to see the pants. :)
DeleteThis comment has been removed by the author.
DeleteHi, am about to make these pants, but at picture 4. where you measure the waist, add 2" and then divide by 4, do you measure the resulting figure down from the top of the triangle or do you work out where it measures that amount across the tip of the triangle? Thanks
ReplyDelete